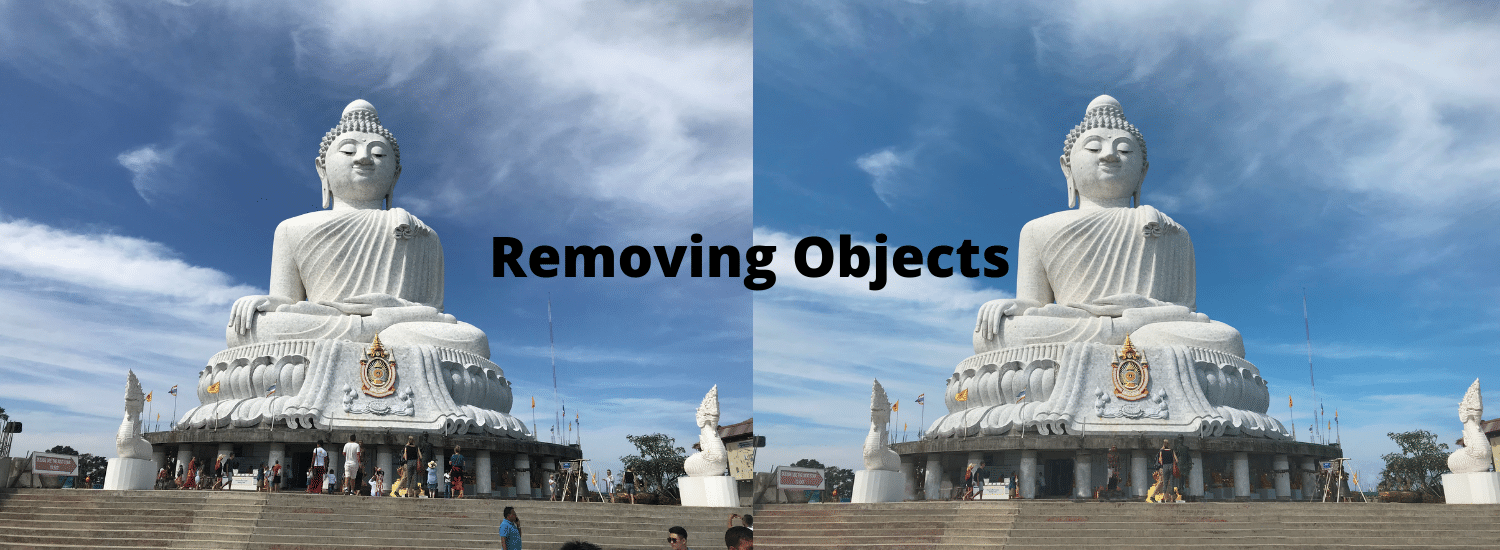
You might be thinking about How To Edit Travel Photographs in Photoshop to give them a perfect professional look. Don’t worry; I am here to provide a complete tutorial on this topic. Most photographers think about how they can turn their images or photographs into professional-looking photographs. It all depends on your photo editing skills.
Here we are going to learn some professional techniques to turn your travel photographs into stunning images.
Which Camera should I use for Photography?
In Photography, basic knowledge of cameras is enough to capture the perfect image. The main thing is that how to capture an incredible scene using any digital camera. People are even taking amazing pictures with their smartphones. It is essential to know how to edit the photos correctly.
Camera pointing and directions are also related to perfect landscape photography. All these aspects are combined to make a heart-winning photograph. Let’s jump into the topic and learn how to be a professional photographer and a photo editor.
How To Edit Travel Photographs in Photoshop:
Before going directly to exposures or colour schemes, give some basic and initial touchups to your photographs. We should do essentials before applying any colour changes. Here we are using Photoshop for this purpose.
1. Remove Objects from Photograph:
First thing first, remove all the unnecessary objects from your image. Yes, you can do this using Adobe Photoshop. If you are visiting a famous place, you will face the “objects in photo” problem. There will be other visitors wandering around, making it difficult for you to capture the best shot. But there is an uncomplicated, simple way to remove such objects from your photograph.
Clone stamp tool:
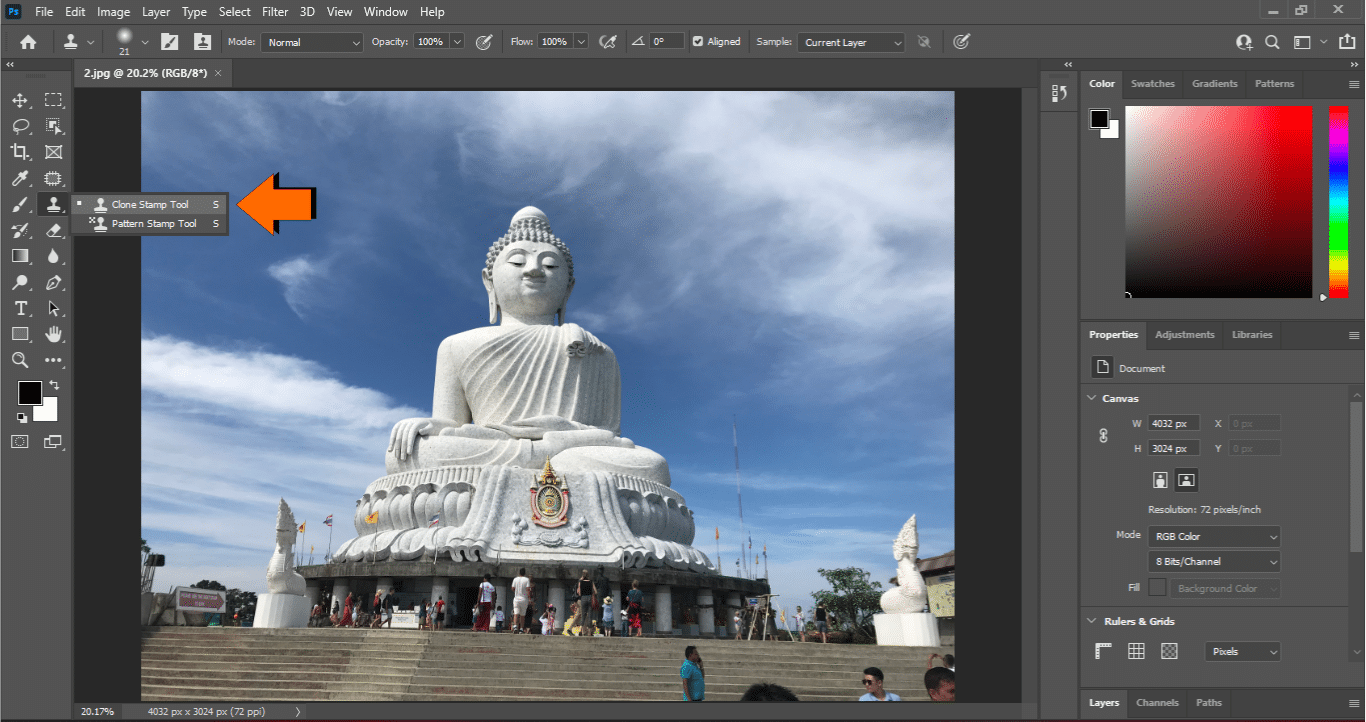
To remove the unnecessary objects, select the “Clone stamp tool” in Photoshop. The clone tool is in the left tool panel, as indicated in the screenshot below.
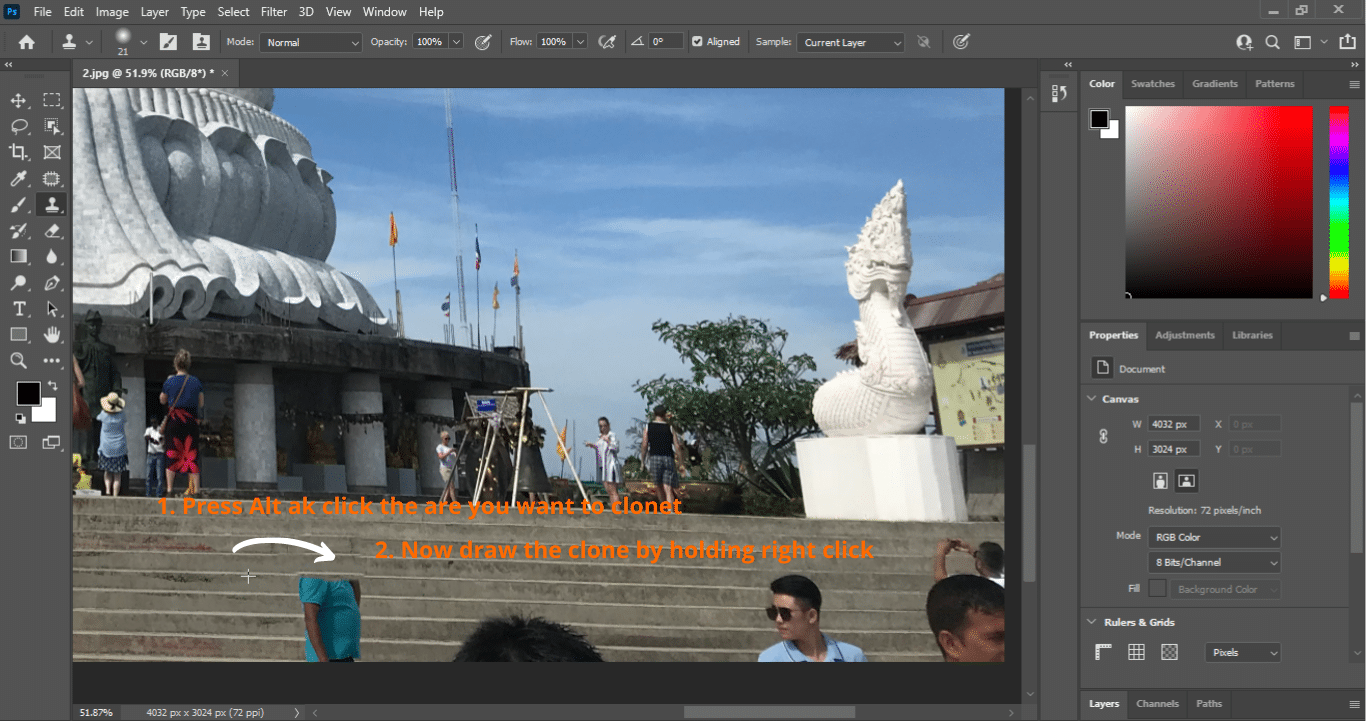
Create a new layer by clicking Ctrl+J. Now start working on this layer. Right-click on the stamp icon and select the Clone Stamp Tool from the file. This tool make clones or copy the area you choose and makes the exact clone. Press and hold the Alt. Now select the location you want to clone by right-clicking on it. Release the “Alt” key and move your cursor to the point where you want to make the same pattern. Press right-click and start drawing on the object. This technique always works. If you’re going to make a clone, select the nearby area
Zoom in on your image to make the removal as precise and accurate as possible. Now you have access to a more significant area to select for cloning. Do not repeat the same spot again and again. It will create a similar pattern, and your image will look distorted.
Laso Tool:
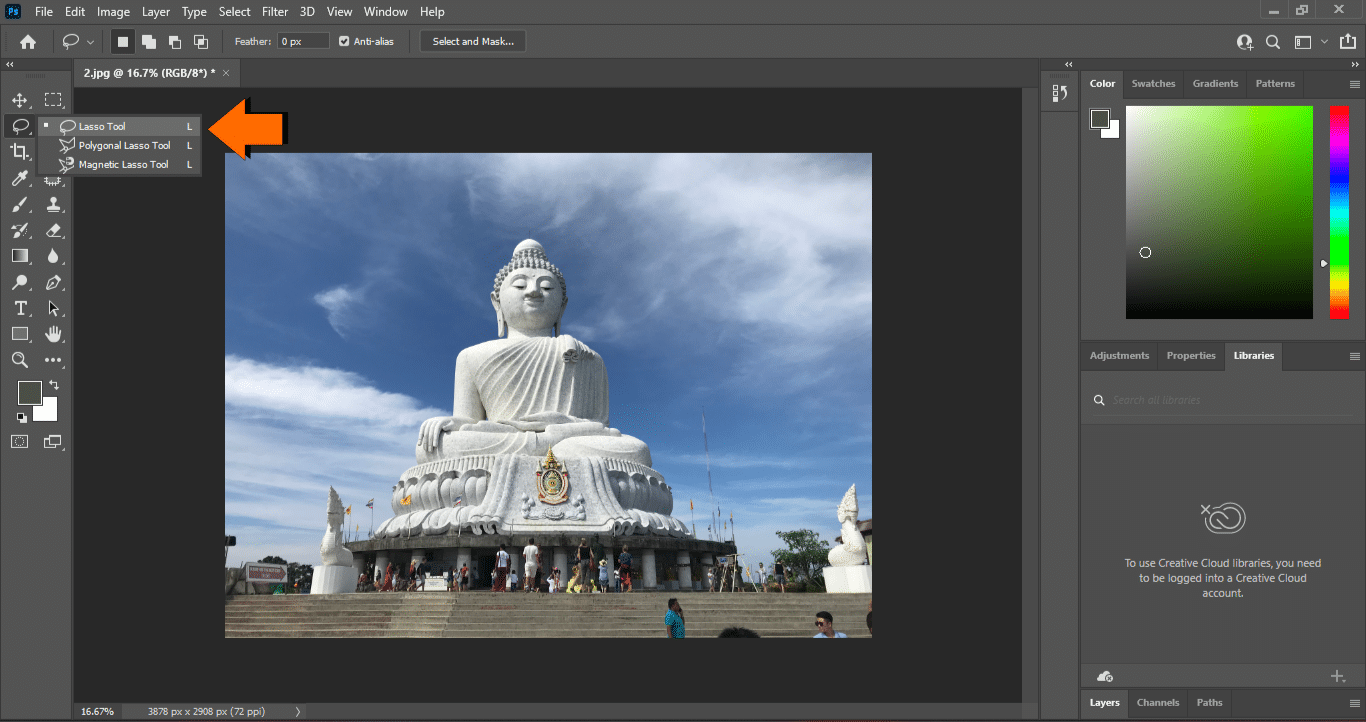
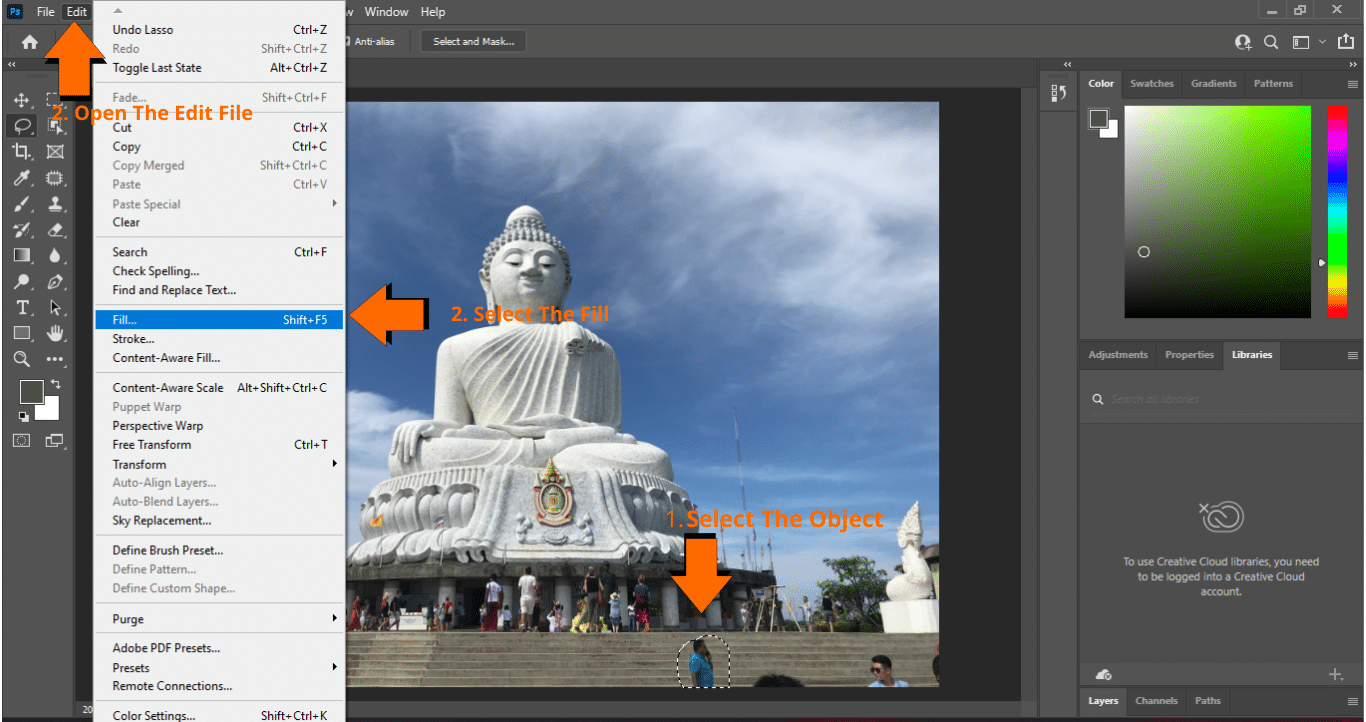
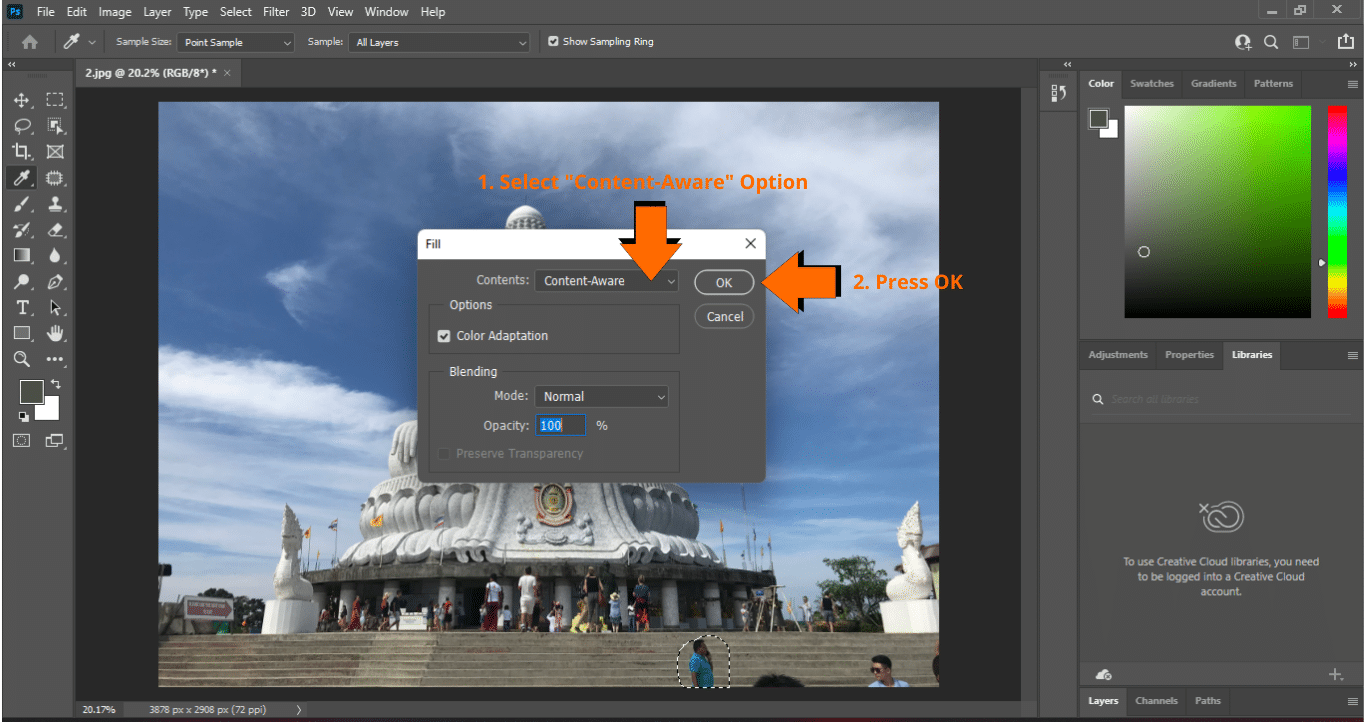
The second way is by using Laso Tool. Select the freehand area of your object. Try to trace the thing as close as possible. Now go to the edit the file, press Fill. After opening fill, select Content-Aware from the content list. Make sure the “Color adaptation” option is checked. Now press ok and then press Ctrl+D. Boom, your object will vanish from the scene. There will be some glitches, but you can handle them with the stamp tool.
Patched Tool:
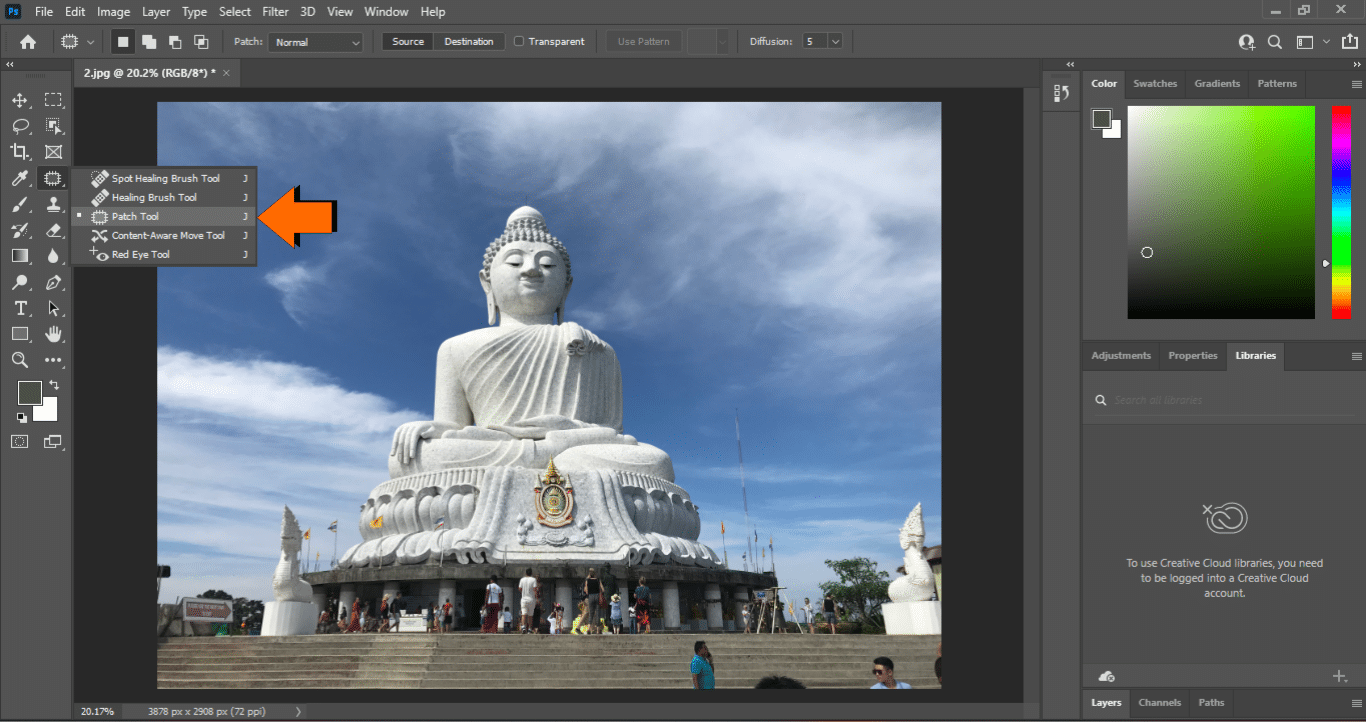
The third quick and best method is to use the Patched Tool. Go to the healing brush tool and click right on it. Select the pattern tool from the list. The select area around the object you want to remove and then swipe the selection to a similar area in the image. It will replace the selected location with that specific similar area.
You can select any of the above methods to remove the unnecessary objects from your photograph. Now the next thing is to Straighten your photo.
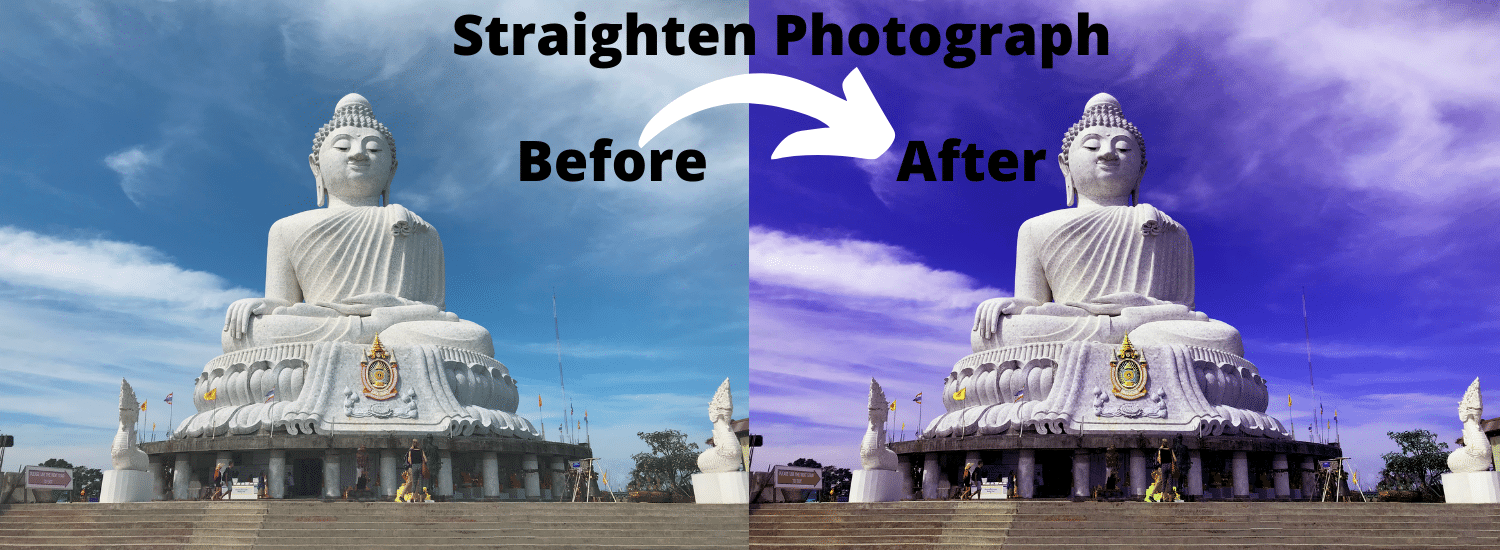
2. Straighten the Photograph:
In Photoshop image editing, you have to rotate, remove, or crop the image before applying the colour scheme or effects. Because colour application before the initial editing may affect the overall view of the image. It is not possible to remove objects or rotate certain things in a photograph after editing filters.
To straighten the photograph, you have to make a reference point in the image. This reference point could be a door frame, stairs, horizon at the beach, or any straight line in the picture.
Crop Tool:
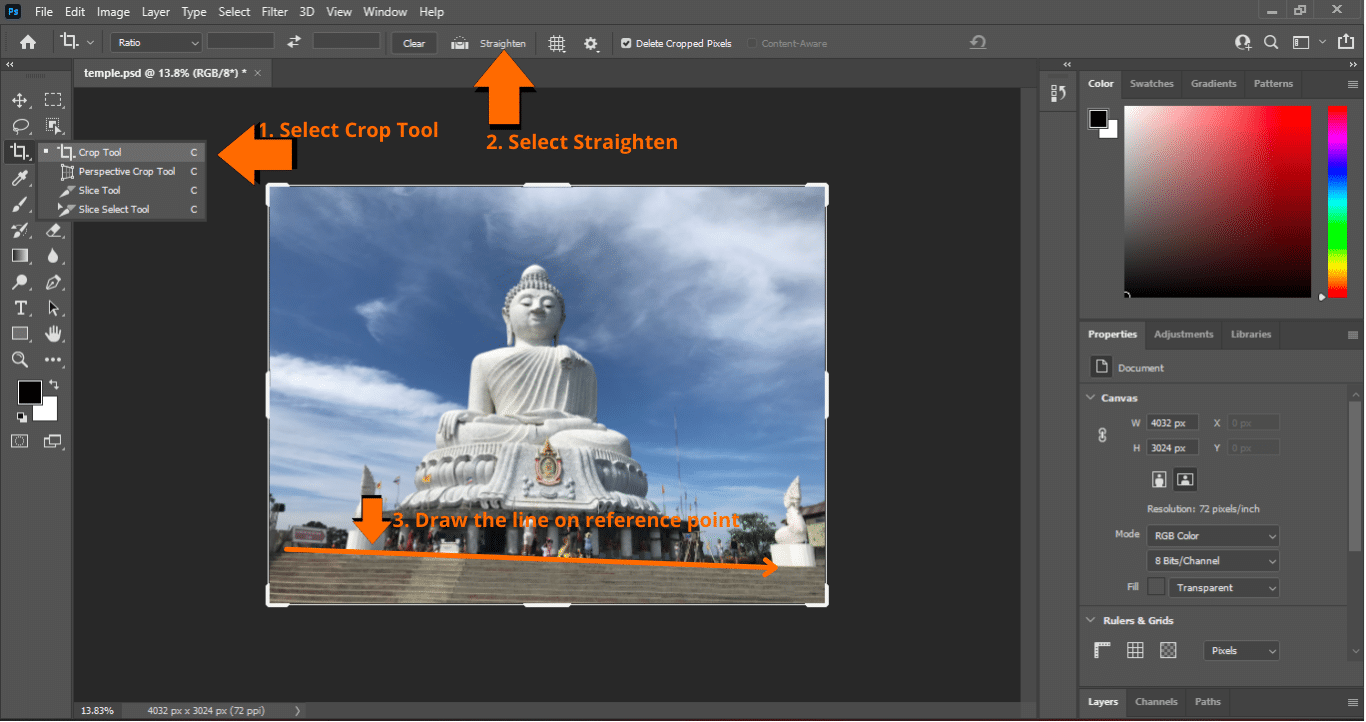
Select the Crop Tool from left the toolbar or just press C. On the top toolbar, there is an option called straighten; click the button. An icon will appear with your cursor, indicating that you have selected the tool.
Now click on one side of the straight line, like for stairs are the reference point. Click on one side where stairs are starting. Now click on the other end of the stairs. You have to draw a straight line along with the first stair.
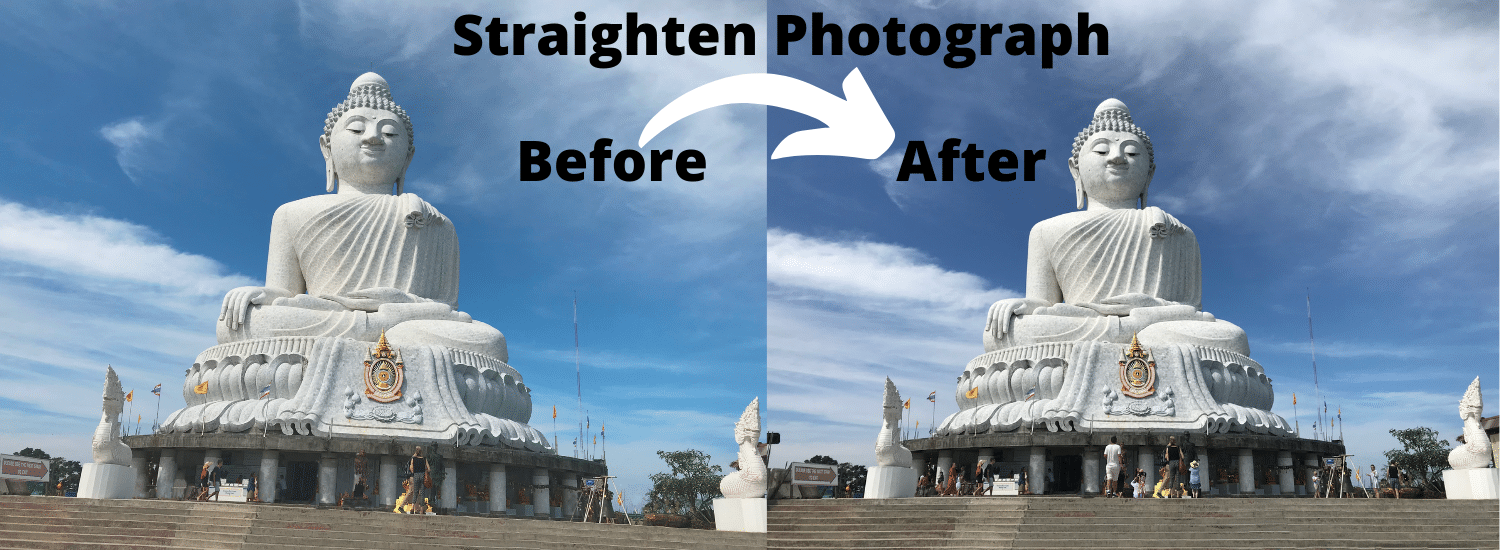
Now press the enter key; the Straightner tool will straighten your image according to that reference point. It is the quickest and easy way to straighten a photo in Photoshop. If your picture has been cropped from the edges, don’t worry about that. You can use the Content-Aware option to fill the cropped area.
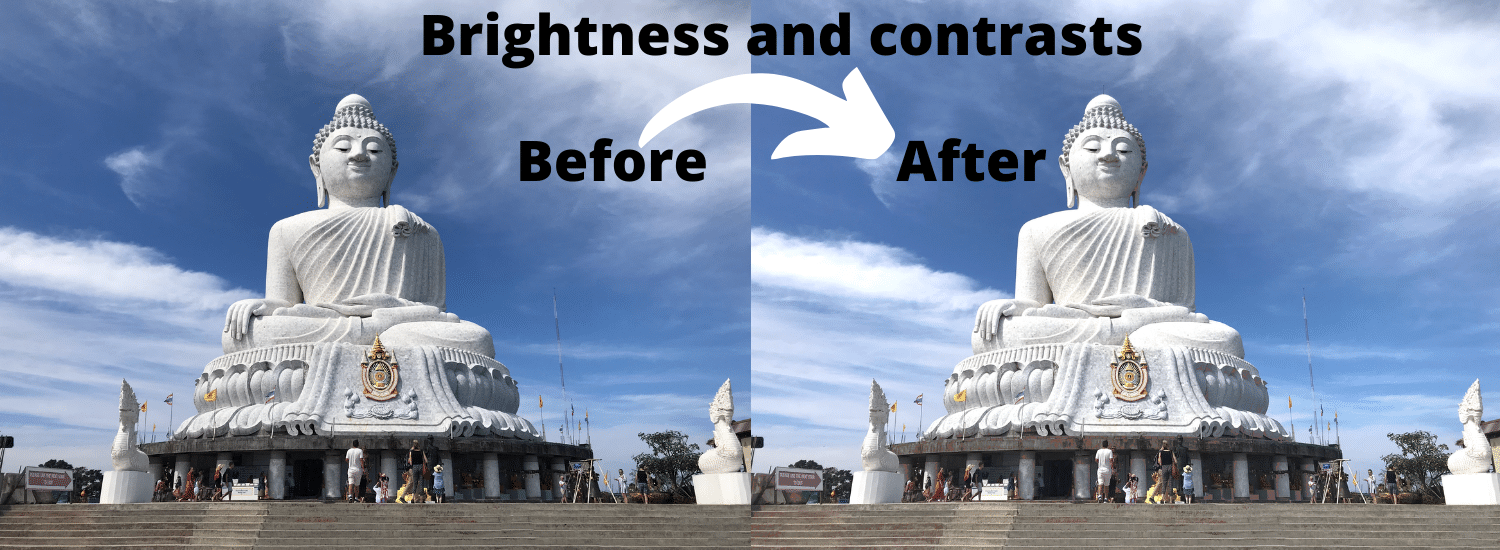
3. Brightness and contrasts:
After the initial object removal and rotation adjustments, we will adjust the colour scheme of our photo to make it look beautiful. To make your vacation photos stunning using Adobe Photoshop photo editing, you have to enhance some colours of your image. Here we are going to discuss how to do so.
Shadows and sunlight sometimes appear in your photographs, but they are not visible due to blurred colour effects. But using Photoshop will make them visible and beautify your photo.
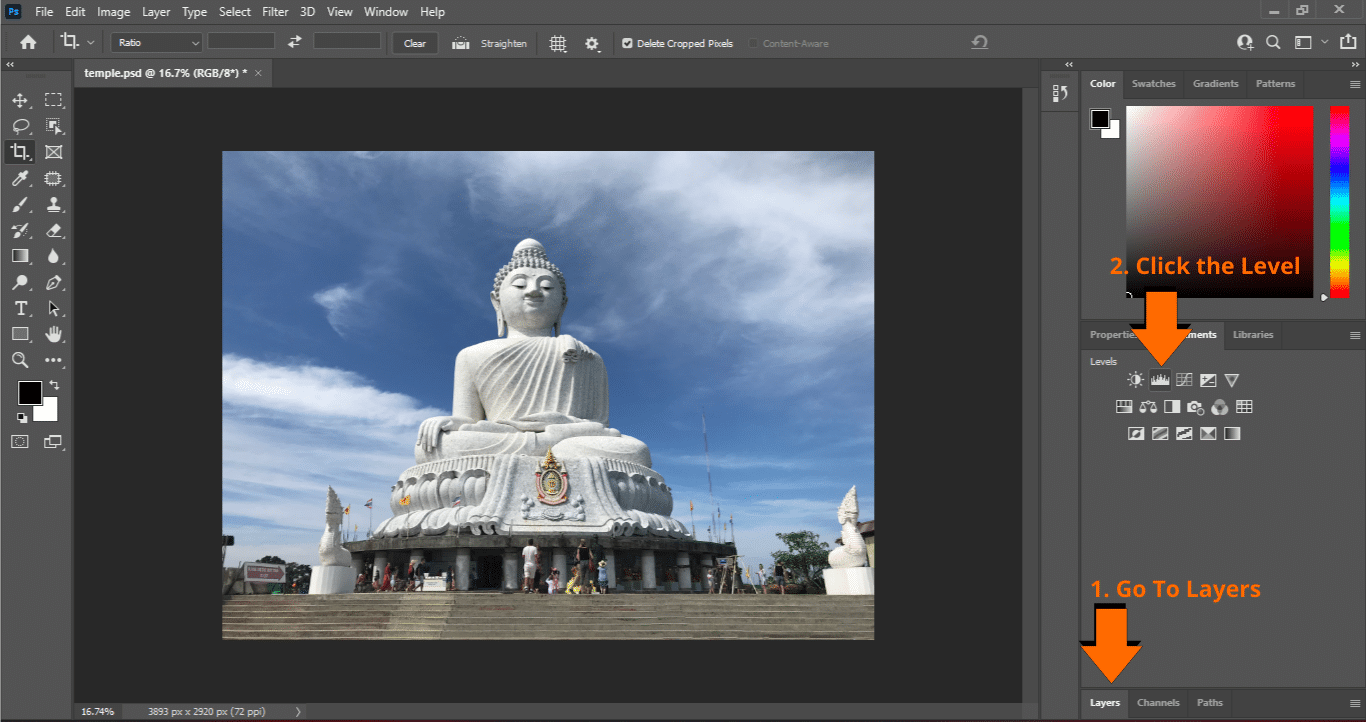
First of all, we will adjust the primary colours of the image using a level adjustment layer. Go to the right lower corner of Photoshop, select layer, and then select adjustment from the option.
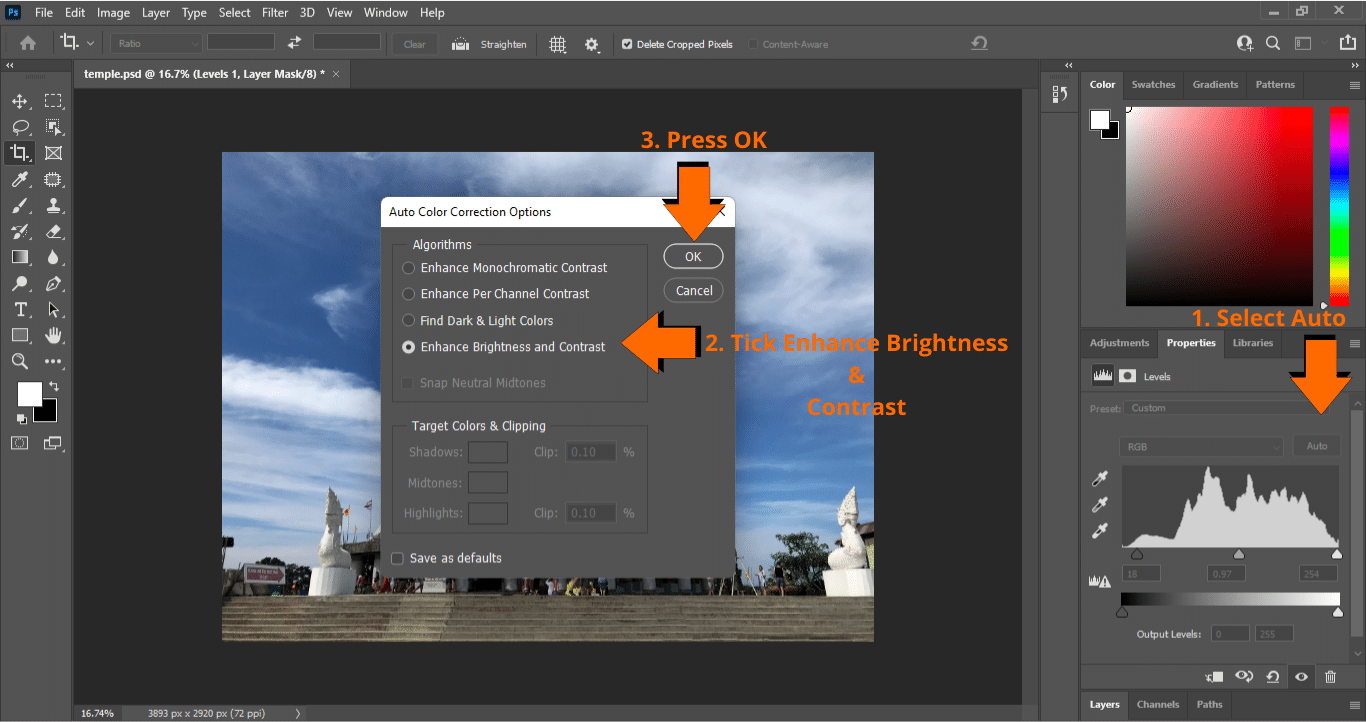
You can select a black and white point adjustment to adjust these colours manually or just hit the auto that automatically changes the colours. I prefer to choose the auto settings. Now you have adjusted the black and white colour scheme of the photograph. It’s time to change some other colours too.
Auto is the best option to do this work if you don’t know about contrast and colour adjustments. After opening the window, tick the Find dark and light colours” and then click the Snap Neutral Midtunes option. It is the best option to adjust photo colours. Click ok to apply the changes.
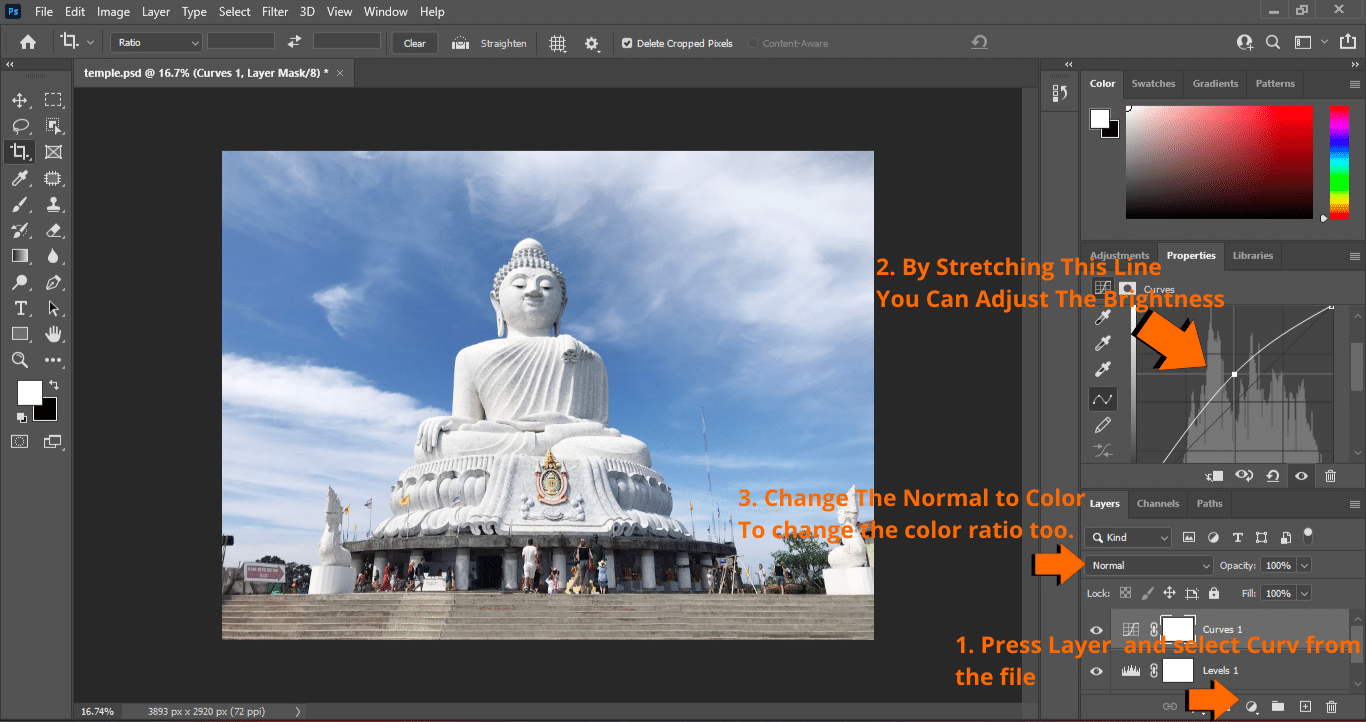
To adjust the brightness of your photograph, right-click on the adjustment layer and then select the Curve option. A graph will appear on the screen. Adjust the brightness by moving the central line of the chart.
Now adjust different colours starting from the primary red, green, and blue (RGB). Select these colours one by one and adjust using the same straight line on the graph.
Restrict some colours to the image by blending them. Double click on your layer, an option window will pop up. You can now adjust all three colour layers separately by adjusting these scrollers.
4. Hue and Saturation:
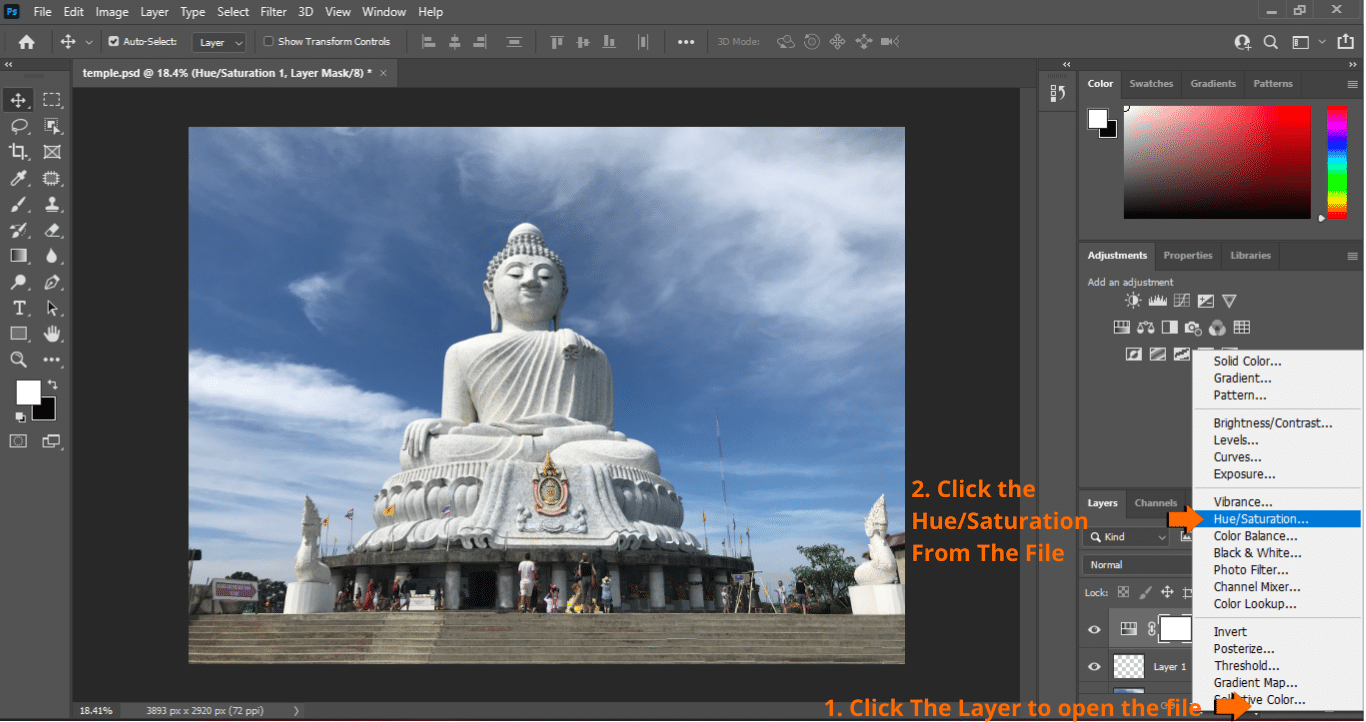
The last part is to adjust the Hue and Saturation of your photograph. These two options enable us to change the colour values of the image. We use these options to enhance the dull colours to make the appearance elegant.
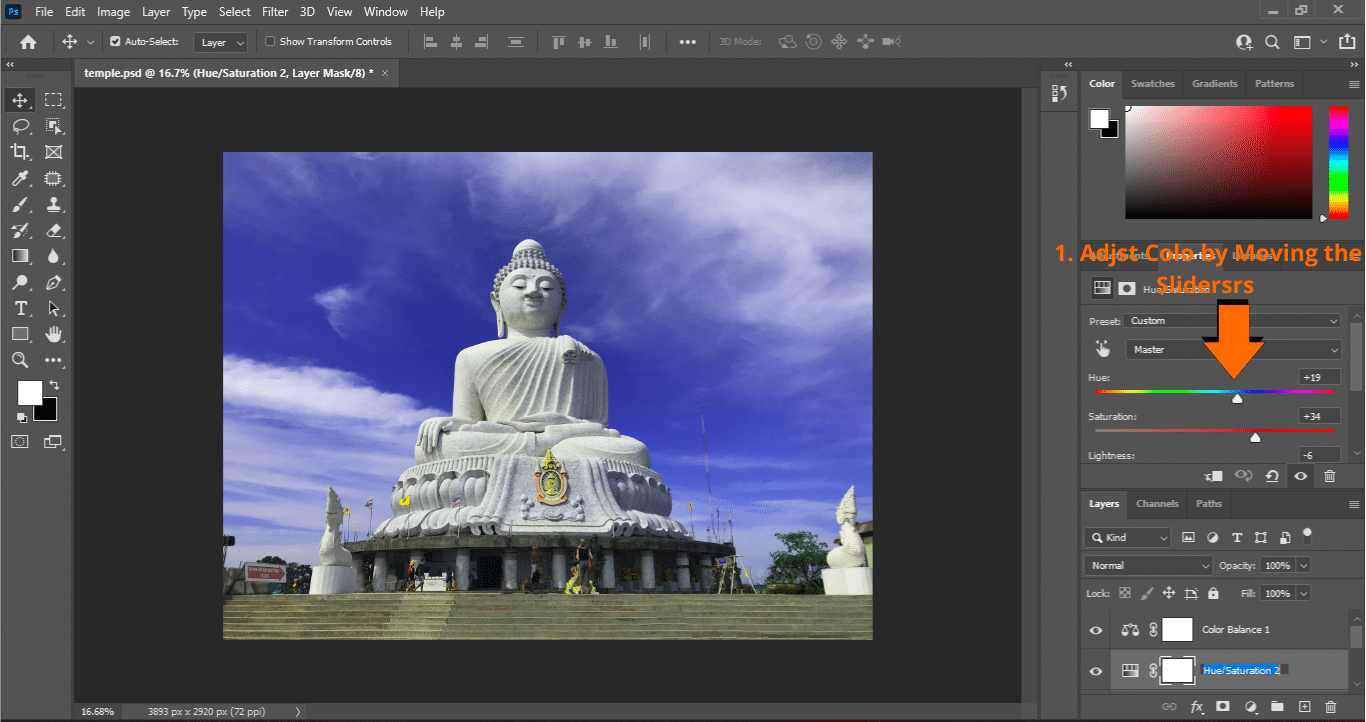
Click on the adjustment layer again. In the file, click the Hue and Saturation option. A settings panel will appear. Now enhance the colours that are most visible in the image. In our picture, the blue sky is the most visible spectrum. I am dragging the hue towards the blue to enhance the blue colour. Increase the saturation of that colour a little bit. Don’t exceed any of the settings; otherwise, your image exposure will be completely disturbed.
After adjusting all these settings, export your image to as png as this format have the highest resolution settings. Save as a Large file to avoid any pixel issues.

